Pinia 初始化
用法与 Vue3 完全一致,仅需适配兼容性问题。
持久化存储插件
安装持久化存储插件: pinia-plugin-persistedstate
pnpm i pinia pinia-plugin-persistedstate插件默认使用 localStorage 实现持久化,小程序端不兼容,需要替换持久化 API。
以及安装必要的依赖,否则会导致构建mp-weixin报错:
pnpm add destr deep-pick-omit -D官方文档
在深入研究核心概念之前,我们得知道 Store 是用 defineStore() 定义的,它的第一个参数要求是一个独一无二的名字:
import { defineStore } from 'pinia'

//  `defineStore()` 的返回值的命名是自由的
// 但最好含有 store 的名字,且以 `use` 开头,以 `Store` 结尾。
// (比如 `useUserStore`,`useCartStore`,`useProductStore`)
// 第一个参数是你的应用中 Store 的唯一 ID。
export const useAlertsStore = defineStore('alerts', {
  // 其他配置...
})这个名字 ,也被用作 id ,是必须传入的, Pinia 将用它来连接 store 和 devtools。为了养成习惯性的用法,将返回的函数命名为 use... 是一个符合组合式函数风格的约定。
defineStore() 的第二个参数可接受两类值:Setup 函数或 Option 对象。
Option Store
与 Vue 的选项式 API 类似,我们也可以传入一个带有 state、actions 与 getters 属性的 Option 对象:
export const useCounterStore = defineStore('counter', {
  state: () => ({ count: 0, name: 'Eduardo' }),
  getters: {
    doubleCount: (state) => state.count * 2,
  },
  actions: {
    increment() {
      this.count++
    },
  },
})你可以认为 state 是 store 的数据 (data),getters 是 store 的计算属性 (computed),而 actions 则是方法 (methods)。
为方便上手使用,Option Store 应尽可能直观简单。
Setup Store
也存在另一种定义 store 的可用语法。与 Vue 组合式 API 的 setup 函数 相似,我们可以传入一个函数,该函数定义了一些响应式属性和方法,并且返回一个带有我们想暴露出去的属性和方法的对象。
export const useCounterStore = defineStore('counter', () => {
  const count = ref(0)
  const name = ref('Eduardo')
  const doubleCount = computed(() => count.value * 2)
  function increment() {
    count.value++
  }

  return { count, name, doubleCount, increment }
})在 Setup Store 中:
ref()就是state属性computed()就是gettersfunction()就是actions
注意,要让 pinia 正确识别 state,你必须在 setup store 中返回 state 的所有属性。这意味着,你不能在 store 中使用私有属性。不完整返回会影响 SSR ,开发工具和其他插件的正常运行。
Setup store 比 Option Store 带来了更多的灵活性,因为你可以在一个 store 内创建侦听器,并自由地使用任何组合式函数。不过,请记住,使用组合式函数会让 SSR 变得更加复杂。
Setup store 也可以依赖于全局提供的属性,比如路由。任何应用层面提供的属性都可以在 store 中使用 inject() 访问,就像在组件中一样:
import { inject } from 'vue'
import { useRoute } from 'vue-router'
import { defineStore } from 'pinia'

export const useSearchFilters = defineStore('search-filters', () => {
  const route = useRoute()
  // 这里假定 `app.provide('appProvided', 'value')` 已经调用过
  const appProvided = inject('appProvided')

  // ...

  return {
    // ...
  }
})::: denger
不要返回像 route 或 appProvided (上例中)之类的属性,因为它们不属于 store,而且你可以在组件中直接用 useRoute() 和 inject('appProvided') 访问。
:::
你应该选用哪种语法?
和在 Vue 中如何选择组合式 API 与选项式 API 一样,选择你觉得最舒服的那一个就好。两种语法都有各自的优势和劣势。Option Store 更容易使用,而 Setup Store 更灵活和强大。如果你想深入了解两者之间的区别,请查看 Mastering Pinia 中的 Option Stores vs Setup Stores 章节。
使用 Store
虽然我们前面定义了一个 store,但在我们使用 <script setup> 调用 useStore()(或者使用 setup() 函数,像所有的组件那样) 之前,store 实例是不会被创建的:
<script setup>
import { useCounterStore } from '@/stores/counter'
// 在组件内部的任何地方均可以访问变量 `store` ✨
const store = useCounterStore()
</script>你可以定义任意多的 store,但为了让使用 pinia 的益处最大化(比如允许构建工具自动进行代码分割以及 TypeScript 推断),你应该在不同的文件中去定义 store。
一旦 store 被实例化,你可以直接访问在 store 的 state、getters 和 actions 中定义的任何属性。我们将在后续章节继续了解这些细节,目前自动补全将帮助你使用相关属性。
请注意,store 是一个用 reactive 包装的对象,这意味着不需要在 getters 后面写 .value。就像 setup 中的 props 一样,我们不能对它进行解构:
<script setup>
import { useCounterStore } from '@/stores/counter'
import { computed } from 'vue'

const store = useCounterStore()
// ❌ 下面这部分代码不会生效,因为它的响应式被破坏了
// 与 reactive 相同: https://vuejs.org/guide/essentials/reactivity-fundamentals.html#limitations-of-reactive
const { name, doubleCount } = store
name // 将会一直是 "Eduardo" //
doubleCount // 将会一直是 0 //
setTimeout(() => {
  store.increment()
}, 1000)
// ✅ 而这一部分代码就会维持响应式
// 💡 在这里你也可以直接使用 `store.doubleCount`
const doubleValue = computed(() => store.doubleCount)
</script>从 Store 解构
为了从 store 中提取属性时保持其响应性,你需要使用 storeToRefs()。它将为每一个响应式属性创建引用。当你只使用 store 的状态而不调用任何 action 时,它会非常有用。请注意,你可以直接从 store 中解构 action,因为它们也被绑定到 store 上:
<script setup>
import { storeToRefs } from 'pinia'
import { useCounterStore } from '@/stores/counter' // 需要引入 store
const store = useCounterStore()
// `name` 和 `doubleCount` 都是响应式引用
// 下面的代码同样会提取那些来自插件的属性的响应式引用
// 但是会跳过所有的 action 或者非响应式(非 ref 或者 非 reactive)的属性
const { name, doubleCount } = storeToRefs(store)
// 名为 increment 的 action 可以被解构
const { increment } = store
</script>Pinia 配置
基本配置
import { defineStore } from 'pinia'
import { ref } from 'vue'

// 定义 Store
export const useMemberStore = defineStore(
  'member',
  () => {
    // 会员信息
    const profile = ref<any>()

    // 保存会员信息,登录时使用
    const setProfile = (val: any) => {
      profile.value = val
    }

    // 清理会员信息,退出时使用
    const clearProfile = () => {
      profile.value = undefined
    }

    // 记得 return
    return {
      profile,
      setProfile,
      clearProfile,
    }
  },
  // TODO: 持久化
  {
    persist: true,
  },
)import { createPinia } from 'pinia'
import persist from 'pinia-plugin-persistedstate'
// 创建 pinia 实例
const pinia = createPinia()
// 使用持久化存储插件
pinia.use(persist)
// 默认导出,给 main.ts 使用
export default pinia
// 模块统一导出
export * from './modules/member'
// .. 后续新增的模块,都需要在这里统一导出才可以使用import { createSSRApp } from 'vue'
import pinia from './stores'
import App from './App.vue'
export function createApp() {
const app = createSSRApp(App)
app.use(pinia)
return {
app,
}
}多端兼容
网页端持久化 API
// 网页端API
localStorage.setItem()
localStorage.getItem()多端持久化 API
// 兼容多端API
uni.setStorageSync()
uni.getStorageSync()参考代码
// stores/modules/member.ts
export const useMemberStore = defineStore(
  'member',
  () => {
    //…省略
  },
  {
    // 配置持久化
    persist: {
      // 调整为兼容多端的API
      storage: {
        setItem(key, value) {
          uni.setStorageSync(key, value)
        },
        getItem(key) {
          return uni.getStorageSync(key)
        },
      },
    },
  },
)拦截器&请求函数
拦截器 - 创建 http.ts 模块
uniapp 拦截器: uni.addInterceptor
接口说明:接口文档
实现需求
- 拼接基础地址
- 设置超时时间
- 添加请求头标识
- 添加 token
src/utils/http.ts
// src/utils/http.ts

import { useMemberStore } from '@/stores'

// 请求基地址
const baseURL = 'https://pcapi-xiaotuxian-front-devtest.itheima.net'

// 拦截器配置
const httpInterceptor = {
  // 拦截前触发
  invoke(options: UniApp.RequestOptions) {
    // 1. 非 http 开头需拼接地址
    if (!options.url.startsWith('http')) {
      options.url = baseURL + options.url
    }
    // 2. 请求超时
    options.timeout = 10000
    // 3. 添加小程序端请求头标识
    options.header = {
      'source-client': 'miniapp',
      ...options.header,
    }
    // 4. 添加 token 请求头标识
    const memberStore = useMemberStore()
    const token = memberStore.profile?.token
    if (token) {
      options.header.Authorization = token
    }
  },
}

// 拦截 request 请求
uni.addInterceptor('request', httpInterceptor)
// 拦截 uploadFile 文件上传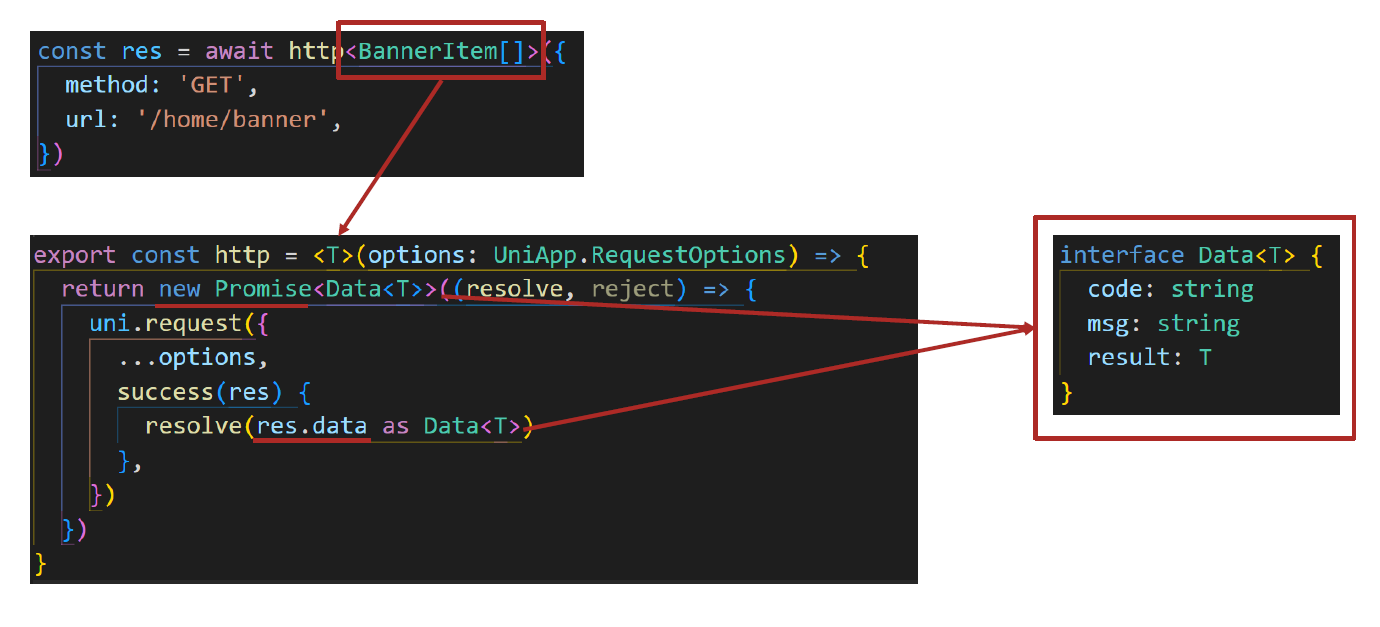
uni.addInterceptor('uploadFile', httpInterceptor)封装 Promise 请求函数
实现需求
- 返回 Promise 对象,用于处理返回值类型
- 成功 resolve
- 提取数据
- 添加泛型
- 失败 reject
- 401 错误
- 其他错误
- 网络错误
参考代码
/**
 * 请求函数
 * @param  UniApp.RequestOptions
 * @returns Promise
 *  1. 返回 Promise 对象,用于处理返回值类型
 *  2. 获取数据成功
 *    2.1 提取核心数据 res.data
 *    2.2 添加类型,支持泛型
 *  3. 获取数据失败
 *    3.1 401错误  -> 清理用户信息,跳转到登录页
 *    3.2 其他错误 -> 根据后端错误信息轻提示
 *    3.3 网络错误 -> 提示用户换网络
 */
type Data<T> = {
  code: string
  msg: string
  result: T
}
// 2.2 添加类型,支持泛型
export const http = <T>(options: UniApp.RequestOptions) => {
  // 1. 返回 Promise 对象
  return new Promise<Data<T>>((resolve, reject) => {
    uni.request({
      ...options,
      // 响应成功
      success(res) {
        // 状态码 2xx,参考 axios 的设计
        if (res.statusCode >= 200 && res.statusCode < 300) {
          // 2.1 提取核心数据 res.data
          resolve(res.data as Data<T>)
        } else if (res.statusCode === 401) {
          // 401错误  -> 清理用户信息,跳转到登录页
          const memberStore = useMemberStore()
          memberStore.clearProfile()
          uni.navigateTo({ url: '/pages/login/login' })
          reject(res)
        } else {
          // 其他错误 -> 根据后端错误信息轻提示
          uni.showToast({
            icon: 'none',
            title: (res.data as Data<T>).msg || '请求错误',
          })
          reject(res)
        }
      },
      // 响应失败
      fail(err) {
        uni.showToast({
          icon: 'none',
          title: '网络错误,换个网络试试',
        })
        reject(err)
      },
    })
  })
}设置类型
自定义导航栏
前置
// src/pages.json
{
  "path": "pages/index/index",
  "style": {
    "navigationStyle": "custom", // 隐藏默认导航
    "navigationBarTextStyle": "white",
    "navigationBarTitleText": "首页"
  }
}安全区域的概念
不同手机的安全区域不同,适配安全区域能防止页面重要内容被遮挡。
可通过 uni.getSystemInfoSync() 获取屏幕边界到安全区的距离。
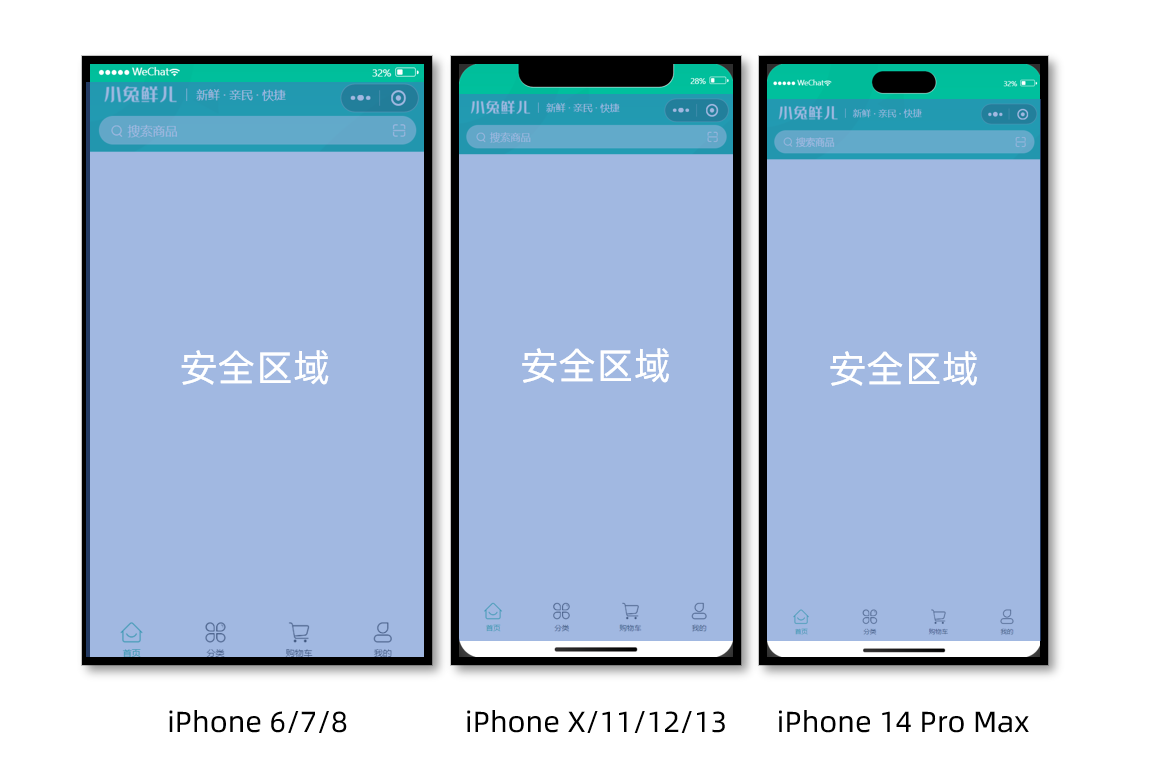
// 获取屏幕边界到安全区域距离
const { safeAreaInsets } = uni.getSystemInfoSync可能需要在 eslint 配置中声明:
{
  files: ['**/*.{js,mjs,cjs,ts,mts,cts,vue}'],
  plugins: { js },
  extends: ['js/recommended'],
  // 增加 uni: 'readonly'
  languageOptions: { globals: { ...globals.browser, ...globals.node, uni: 'readonly' } },
},完整的组件代码:
iconfont 图标
首先,下载所需要的 iconfont 文件:
然后,到项目根组件 App.vue 中添加以下配置:
<script setup lang="ts">
import { onLaunch, onShow, onHide } from '@dcloudio/uni-app'
onLaunch(() => {
console.log('App Launch')
})
onShow(() => {
console.log('App Show')
})
onHide(() => {
console.log('App Hide')
})
</script>
<style>
/* 字体定义必须在所有样式之前 */
@font-face {
font-family: 'iconfont';
src:
url('/static/fonts/iconfont.woff2') format('woff2'),
url('/static/fonts/iconfont.woff') format('woff'),
url('/static/fonts/iconfont.ttf') format('truetype');
font-weight: normal;
font-style: normal;
font-display: block;
/* 添加这一行 */
}
使用:
<template>
<view
class="navbar"
:style="{ paddingTop: safeAreaInsets?.top + 'px' }"
>
<!-- logo文字 -->
<view class="logo">
<image
class="logo-image"
src="@/static/images/yun-logo.png"
></image>
<text class="logo-image-text">云峰农服</text>
<!-- <text class="logo-text">快捷 · 易用 · 高效</text> -->
</view>
<!-- 搜索条 -->
<!-- <view class="search">
<text class="icon-search">搜索商品</text>
<text class="icon-scan"></text>
</view> -->
<!-- navBar-bottom -->
<view class="navbar-bottom">
<div class="tianqi">
<text class="tianqi-temp">28°</text>
<text class="tianqi-desc">晴</text>
<image
class="tianqi-icon"
src="@/static/icon/天气-晴.svg"
></image>
</div>
<div class="location">
<text class="iconfont location-icon"></text>
<text class="info-text">牡丹区</text>
</div>
<div class="shidu">
<text class="iconfont shidu-icon"></text>
<text class="info-text">65%</text>
</div>
<div class="air">
<text class="iconfont air-icon"></text>
<text class="info-text air-text">良好</text>
</div>
</view>
</view>
</template>iconify 在uniapp 中的使用-适配小程序
在 uni-app(Vue3 版本) 中使用 Iconify 图标系统 是完全可行的,而且比很多本地图标方案更灵活(比如支持上千套图标库)。
第一步,安装依赖:
pnpm add @iconify/vue第二步,配置按需引入:
需要借助:
- 👉 unplugin-vue-components
- 👉 unplugin-auto-import
这两个插件是 Vite 官方推荐的自动导入方案:
坑位:需要指定版本号,否则会报一些兼容性错误: "unplugin-auto-import": "19", "unplugin-vue-components": "28",
pnpm add -D unplugin-vue-components@28 unplugin-auto-import@19unplugin-vue-components 会生成 src/components.d.ts,里面也会声明 <Icon>
然后:vite.config.ts
import { defineConfig } from 'vite'
import uni from '@dcloudio/vite-plugin-uni'
import Components from 'unplugin-vue-components/vite'
import AutoImport from 'unplugin-auto-import/vite'
// https://vitejs.dev/config/
export default defineConfig({
plugins: [
uni(), // 自动引入 vue api (可选)
AutoImport({
imports: ['vue'],
dts: 'src/auto-imports.d.ts',
}),
由于 小程序环境下无法直接使用 Iconify 的 SVG 渲染。
因此需要第三步:创建 @/utils/iconLoader.ts
// src/utils/iconLoader.ts
import { getIconData } from '@iconify/utils/lib/icon-set/get-icon';

// 1. 导入所有需要的图标集
// 罪魁祸首,注释掉后减少了 7MB+,这完全解决了包体积问题。
// import { icons as mdiIcons } from '@iconify-json/mdi';
// import { icons as phIcons } from '@iconify-json/ph';
import { icons as wiIcons } from '@iconify-json/wi'; // ← 新增这行

// 相当于:
// const mdiIcons = require('@iconify-json/mdi').icons
// const phIcons = require('@iconify-json/ph').icons

// 2. 定义图标数据类型
export interface IconData {
  body: string      // SVG path 数据
  width: number     // 图标原始宽度
  height: number    // 图标原始高度
}

// 3. 配置支持的图标集映射
const iconSets: Record<string, any> = {
  // // Material Design Icons - 谷歌 Material Design 风格
  // 'mdi': mdiIcons,

  // // Phosphor Icons - 灵活的一致性图标
  // 'ph': phIcons,

  // Weather Icons - 天气图标集 ← 新增这个映射
  'wi': wiIcons,

}

// 4. 图标集信息(用于错误提示和文档)
export const iconSetInfo: Record<string, { name: string; count: number }> = {
  'mdi': { name: 'Material Design Icons', count: 7000 },
  'ph': { name: 'Phosphor Icons', count: 6000 },
  'wi': { name: 'Weather Icons', count: 215 },  // ← 新增这行
  'tabler': { name: 'Tabler Icons', count: 4500 },
  'carbon': { name: 'Carbon Icons', count: 2000 },
  'fa6-regular': { name: 'Font Awesome 6 Regular', count: 2000 },
  'fa6-solid': { name: 'Font Awesome 6 Solid', count: 2000 },
  'fa6-brands': { name: 'Font Awesome 6 Brands', count: 2000 },
}

// 5. 核心图标数据获取函数
export const getIconSVGData = (iconName: string): IconData | null => {
  try {
    // 5.1 解析图标名称
    const [prefix, name] = iconName.split(':')

    // 5.2 验证名称格式
    if (!prefix || !name) {
      console.warn(`🚫 图标名称格式错误: "${iconName}"。正确格式: "前缀:图标名"`)
      return null
    }

    // 5.3 查找对应的图标集
    const iconSet = iconSets[prefix]
    if (!iconSet) {
      const supportedPrefixes = Object.keys(iconSets).join(', ')
      console.warn(`🚫 不支持的图标集: "${prefix}"。支持的图标集: ${supportedPrefixes}`)
      return null
    }

    // 5.4 获取图标数据
    const iconData = getIconData(iconSet, name)
    if (!iconData) {
      const info = iconSetInfo[prefix]
      console.warn(`🚫 图标不存在: "${iconName}"。${info ? `请在 ${info.name} 中查看可用图标` : ''}`)
      return null
    }

    // 5.5 验证数据完整性
    if (!iconData.body || !iconData.width || !iconData.height) {
      console.warn(`🚫 图标数据不完整: "${iconName}"`)
      return null
    }

    // 5.6 返回标准化数据
    return {
      body: iconData.body,
      width: iconData.width,
      height: iconData.height
    }

  } catch (error) {
    console.error(`💥 获取图标数据时发生错误: "${iconName}"`, error)
    return null
  }
}

// 6. 批量获取图标数据(优化性能)
export const getMultipleIconsData = (iconNames: string[]): Record<string, IconData | null> => {
  const result: Record<string, IconData | null> = {}

  iconNames.forEach(iconName => {
    result[iconName] = getIconSVGData(iconName)
  })

  return result
}

// 7. 工具函数:获取支持的图标集列表
export const getSupportedIconSets = () => {
  return Object.entries(iconSetInfo).map(([prefix, info]) => ({
    prefix,
    name: info.name,
    count: info.count
  }))
}

// 8. 工具函数:检查图标是否存在
export const isIconAvailable = (iconName: string): boolean => {
  return getIconSVGData(iconName) !== null
}创建 @/components/SmartIcon.vue
<!-- src/components/SmartIcon.vue -->
<template>
  <view
    v-if="isMpWeixin"
    class="smart-icon"
    :class="customClass"
  >
    <!-- 调试信息 -->
    <view
      v-if="showDebug"
      class="debug-panel"
    >
      <text class="debug-text">图标: {{ icon }}</text>
      <text class="debug-text">数据: {{ iconData ? '有' : '无' }}</text>
      <text class="debug-text">URL长度: {{ iconSvgUrl?.length || 0 }}</text>
    </view>

    <image
      v-if="iconSvgUrl && !loadError"
      :src="iconSvgUrl"
      class="smart-icon-image"
      :style="imageSizeStyle"
      mode="aspectFit"
      @load="handleImageLoad"
      @error="handleImageError"
    />

    <view
      v-else
      class="icon-error"
      :style="imageSizeStyle"
    >
      <text class="error-text">?</text>
    </view>
  </view>

  <Icon
    v-else
    :icon="icon"
    :width="width"
    :height="height"
    :color="color"
  />
</template>

<script setup lang="ts">
import { getIconSVGData, type IconData } from '@/utils/iconLoader'
import { Icon } from '@iconify/vue'
import { computed, defineProps, onMounted, ref, watch, withDefaults } from 'vue'

const props = withDefaults(
  defineProps<{
    icon: string
    width?: number
    height?: number
    color?: string
    customClass?: string
    showDebug?: boolean
  }>(),
  {
    width: 24,
    height: 24,
    color: '#000000',
    customClass: '',
    showDebug: true,
  },
)

const isMpWeixin = process.env.UNI_PLATFORM === 'mp-weixin'
const iconData = ref<IconData | null>(null)
const isLoading = ref(false)
const loadError = ref(false)

const imageSizeStyle = computed(() => ({
  width: `${props.width}px`,
  height: `${props.height}px`,
}))

const showDebug = computed(() => props.showDebug)

// 手动 Base64 编码函数
const manualBase64Encode = (uint8Array: Uint8Array): string => {
  const chars = 'ABCDEFGHIJKLMNOPQRSTUVWXYZabcdefghijklmnopqrstuvwxyz0123456789+/='
  let output = ''

  for (let i = 0; i < uint8Array.length; i += 3) {
    const a = uint8Array[i] ?? 0
    const b = uint8Array[i + 1] || 0
    const c = uint8Array[i + 2] || 0

    const bits = (a << 16) | (b << 8) | c

    output += chars.charAt((bits >> 18) & 0x3f)
    output += chars.charAt((bits >> 12) & 0x3f)
    output += chars.charAt((bits >> 6) & 0x3f)
    output += chars.charAt(bits & 0x3f)
  }

  // 添加填充
  const padding = uint8Array.length % 3
  if (padding === 1) {
    output = output.slice(0, -2) + '=='
  } else if (padding === 2) {
    output = output.slice(0, -1) + '='
  }

  return output
}

// 字符串转 ArrayBuffer
const stringToArrayBuffer = (str: string): Uint8Array => {
  if (typeof TextEncoder !== 'undefined') {
    const encoder = new TextEncoder()
    return encoder.encode(str)
  } else {
    // 降级方案
    const buf = new ArrayBuffer(str.length)
    const bufView = new Uint8Array(buf)
    for (let i = 0; i < str.length; i++) {
      bufView[i] = str.charCodeAt(i)
    }
    return bufView
  }
}

// Base64 编码兼容函数
// 修改 Base64 编码兼容函数,移除已弃用的 API 检查
const base64Encode = (str: string): string => {
  try {
    // 统一使用手动 Base64 编码(最可靠)
    const uint8Array = stringToArrayBuffer(str)
    return manualBase64Encode(uint8Array)
  } catch (error) {
    console.error('Base64 编码失败:', error)
    // 降级方案
    return manualBase64Encode(new Uint8Array(Array.from(str).map(c => c.charCodeAt(0))))
  }
}

// 修复 SVG 内容格式问题
const iconSvgUrl = computed(() => {
  if (!isMpWeixin || !iconData.value) return ''

  try {
    console.log('🛠 生成 SVG Data URL...')

    let svgContent = ''

    // 检查 iconData.body 是完整的 SVG 路径标签还是纯路径数据
    if (iconData.value.body.includes('<path')) {
      // 如果 body 已经是完整的 <path> 标签,直接使用
      console.log('📦 使用完整路径标签')
      svgContent = `<?xml version="1.0" encoding="UTF-8"?>
<svg xmlns="http://www.w3.org/2000/svg"
     width="${props.width}"
     height="${props.height}"
     viewBox="0 0 ${iconData.value.width} ${iconData.value.height}">
  ${iconData.value.body.replace(/fill="currentColor"/g, `fill="${props.color}"`)}
</svg>`
    } else {
      // 如果 body 只是路径数据,构建完整的 <path> 标签
      console.log('📦 构建路径标签')
      svgContent = `<?xml version="1.0" encoding="UTF-8"?>
<svg xmlns="http://www.w3.org/2000/svg"
     width="${props.width}"
     height="${props.height}"
     viewBox="0 0 ${iconData.value.width} ${iconData.value.height}">
  <path fill="${props.color}" d="${iconData.value.body}"/>
</svg>`
    }

    console.log('📐 SVG 内容:', svgContent)

    // 清理 SVG(移除换行和多余空格)
    const cleanSvg = svgContent.replace(/\s+/g, ' ').trim()

    // 使用兼容的 base64 编码
    const base64Svg = base64Encode(cleanSvg)
    if (!base64Svg) {
      console.error('❌ Base64 编码失败')
      return ''
    }

    const dataUrl = `data:image/svg+xml;base64,${base64Svg}`

    console.log('🔗 生成的 Data URL(前100字符):', dataUrl.substring(0, 100))

    return dataUrl
  } catch (error) {
    console.error('💥 生成 SVG Data URL 失败:', error)
    return ''
  }
})

// 加载图标数据
const loadIconData = async () => {
  if (!isMpWeixin) return

  console.log(`🔍 加载图标: ${props.icon}`)

  isLoading.value = true
  loadError.value = false
  iconData.value = null

  try {
    const data = getIconSVGData(props.icon)
    console.log('📦 图标数据:', data)

    if (data && data.body) {
      iconData.value = data
      console.log('✅ 图标数据加载成功')

      // 调试:检查 body 内容类型
      if (data.body.includes('<path')) {
        console.log('🔍 body 包含完整路径标签')
      } else {
        console.log('🔍 body 是纯路径数据')
      }
    } else {
      loadError.value = true
      console.warn('❌ 图标数据为空')
    }
  } catch (error) {
    loadError.value = true
    console.error('💥 加载异常:', error)
  } finally {
    isLoading.value = false
  }
}

const handleImageLoad = () => {
  console.log('🎉 图片加载成功!')
  loadError.value = false
}

// eslint-disable-next-line @typescript-eslint/no-explicit-any
const handleImageError = (event: any) => {
  console.error('🖼 图片加载失败:', event)
  console.log('🔗 失败的 Data URL:', iconSvgUrl.value)
  loadError.value = true
}

watch(() => props.icon, loadIconData)
onMounted(loadIconData)
</script>

<style scoped>
.smart-icon {
  display: inline-flex;
  flex-direction: column;
  align-items: center;
  justify-content: center;
}

.smart-icon-image {
  display: block;
}

.debug-panel {
  background: #f0f0f0;
  padding: 4rpx 8rpx;
  border-radius: 4rpx;
  margin-bottom: 8rpx;
}

.debug-text {
  font-size: 10px;
  color: #666;
  display: block;
}

.icon-error {
  display: flex;
  align-items: center;
  justify-content: center;
  background: #ffebee;
  border-radius: 4px;
}

.error-text {
  font-size: 14px;
  color: #f44336;
}
</style>组件中的调试信息
只需要在全局定义一个简单的 debugLog 函数即可,这样既保持了简洁性,又实现了代码复用。
点击查看详情
// src/utils/debugUtils.ts
import { ref } from 'vue'

// // 全局调试开关
// export const debugEnabled = ref(false)

// export const debugLog = (firstArg: string, ...restArgs: any[]) => {
//   if (!debugEnabled.value) return

//   // 如果只有一个参数,直接输出
//   if (restArgs.length === 0) {
//     console.log('🔍', firstArg)
//   }
//   // 如果第二个参数是字符串,认为是组件名模式
//   else if (restArgs.length >= 1 && typeof restArgs[0] === 'string') {
//     const [message, ...args] = restArgs
//     console.log(`🔍 [${firstArg}] ${message}`, ...args)
//   }
//   // 否则是简单调试模式
//   else {
//     console.log('🔍', firstArg, ...restArgs)
//   }
// }

// // 全局开关函数
// export const toggleGlobalDebug = () => {
//   debugEnabled.value = !debugEnabled.value
//   console.log(`🌍 全局调试 ${debugEnabled.value ? '开启' : '关闭'}`)
// }


// src/utils/debugUtils.ts
export const createDebugger = (componentName: string) => {
  const debugEnabled = ref(false)  // 每个组件独立的 ref

  const debugLog = (...args: any[]) => {
    if (debugEnabled.value) {
      console.log(`🔍 [${componentName}]`, ...args)
    }
  }

  const setDebug = (enabled: boolean) => {
    debugEnabled.value = enabled
    console.log(`🎯 ${componentName} 调试 ${enabled ? '开启' : '关闭'}`)
  }

  return {
    debugLog,
    setDebug,
    debugEnabled
  }
}

// 全局开关(可选)
export const globalDebugEnabled = ref(false)// SmartIcon.vue
import { createDebugger } from '@/utils/debugUtils'
const COMPONENT_NAME = 'SmartIcon'
const { debugLog, setDebug, debugEnabled } = createDebugger(COMPONENT_NAME)
setDebug(false) // 添加这一行,组件加载时启停调试
defineExpose({
enableDebug: () => setDebug(true), // 🎯 开启调试
disableDebug: () => setDebug(false), // 🎯 关闭调试
isDebugEnabled: () => debugEnabled.value, // 🎯 检查调试状态
})console.warn 和 console.error
对于 console.warn 和 console.error,最佳实践是:保持原样,不要用开关控制。
🔍 原因分析
- 错误和警告的重要性不同
// 调试信息 - 可以开关控制
debugLog('生成 SVG Data URL...')        // ✅ 可控制

// 警告信息 - 应该始终显示
console.warn('图标数据为空')            // ✅ 始终显示

// 错误信息 - 必须始终显示
console.error('加载异常:', error) // ✅ 必须显示- 不同日志的用途
| 日志类型 | 用途 | 是否应该控制 |
|---|---|---|
console.log | 开发调试信息 | ✅ 应该控制 |
console.warn | 潜在问题警告 | ❌ 不应该控制 |
console.error | 严重错误信息 | ❌ 绝对不应该控制 |
- 实际场景考虑
const loadIconData = async () => {
  try {
    const data = getIconSVGData(props.icon)
    debugLog('图标数据:', data)  // 调试信息,可关闭

    if (!data) {
      console.warn(`⚠️ [${COMPONENT_NAME}] 图标数据为空`)  // 警告,应该显示
      return
    }
  } catch (error) {
    console.error(`💥 [${COMPONENT_NAME}] 加载异常:`, error)  // 错误,必须显示
  }
}iconLoader.ts 的作用
这个 iconLoader.ts 文件是整个图标系统的数据层核心,它与 SmartIcon 组件的关系如下:
核心作用
- 图标数据仓库
// 存储所有图标集的原始数据
const iconSets: Record<string, any> = {
  'mdi': mdiIcons,  // 包含 7000+ Material Design 图标
  'ph': phIcons,     // 包含 6000+ Phosphor 图标
}- 相当于图标的"数据库"
- 管理多个图标集的原始 SVG 数据
- 数据解析器
export const getIconSVGData = (iconName: string): IconData | null => {
  const [prefix, name] = iconName.split(':')  // 解析 "mdi:account-box"
  const iconSet = iconSets[prefix]            // 找到对应的图标集
  const iconData = getIconData(iconSet, name) // 提取具体图标数据
  return { body, width, height }              // 返回标准化数据
}- 将
"mdi:account-box"这样的字符串转换为具体的 SVG 数据 - 提供统一的接口给组件层使用
与 SmartIcon 组件的关联
数据流关系:
text
SmartIcon 组件 (UI层)
    ↓ (请求数据)
iconLoader.ts (数据层)
    ↓ (返回数据)
SmartIcon 组件 (渲染显示)具体调用过程:
- 组件请求数据:
// 在 SmartIcon.vue 中
const loadIconData = async () => {
  const data = getIconSVGData(props.icon)  // 调用 iconLoader
  // data = { body: "<path...>", width: 24, height: 24 }
}- 数据层处理:
// iconLoader.ts 处理 "mdi:account-box"
输入: "mdi:account-box"
输出: {
  body: "<path fill="currentColor" d="M6 17c0-2 4-3.1..."/>",
  width: 24,
  height: 24
}- 组件渲染:
// SmartIcon 使用返回的数据生成 SVG
const svgContent = `
  <svg ...>
    ${iconData.value.body.replace(/fill="currentColor"/g, `fill="${props.color}"`)}
</svg>`架构优势
- 关注点分离
- iconLoader.ts: 只负责数据管理和解析
- SmartIcon.vue: 只负责 UI 渲染和交互
- 可维护性
// 添加新图标集只需在这里扩展
const iconSets = {
  'mdi': mdiIcons,
  'ph': phIcons,
  'fa': faIcons,      // 未来扩展 FontAwesome
  'antd': antdIcons,  // 未来扩展 Ant Design
}- 错误处理
// 统一的数据验证和错误提示
if (!iconSet) {
  console.warn(`不支持的图标集: "${prefix}"`)
}
if (!iconData) {
  console.warn(`图标不存在: "${iconName}"`)
}- 性能优化
// 支持批量获取,减少重复解析
export const getMultipleIconsData = (iconNames: string[]) => {
  // 一次性获取多个图标数据
}实际工作流程
当你在组件中使用:
<SmartIcon icon="mdi:account-box" color="#52c41a" />实际执行过程:
- 组件调用
getIconSVGData("mdi:account-box") - iconLoader 解析出前缀
mdi和图标名account-box - 在 mdi 图标集中查找
account-box的 SVG 数据 - 返回标准化的
{ body, width, height } - 组件用此数据生成 SVG Data URL
- 最终渲染为图片显示
总结:iconLoader.ts 是图标系统的"大脑",负责所有图标数据的存储、查找和标准化,而 SmartIcon.vue 是"展示层",负责将数据渲染为用户可见的图标。
后期使用 - 增加图标集
🔧 iconLoader.ts 必要修改
步骤1:导入 Weather Icons
pnpm add @iconify-json/wi// src/utils/iconLoader.ts
import { getIconData } from '@iconify/utils/lib/icon-set/get-icon'
// 导入图标集 - 添加 wiIcons
import { icons as mdiIcons } from '@iconify-json/mdi'
import { icons as phIcons } from '@iconify-json/ph'
import { icons as wiIcons } from '@iconify-json/wi' // ← 新增这行 (安装包后自动获取相应的类型声明)步骤2:配置图标集映射
// 配置支持的图标集映射 - 添加 wi 映射
const iconSets: Record<string, any> = {
  'mdi': mdiIcons,
  'ph': phIcons,
  'wi': wiIcons,  // ← 新增这行
}步骤3:更新图标集信息
// 图标集信息 - 添加 wi 信息
export const iconSetInfo: Record<string, { name: string; count: number }> = {
  'mdi': { name: 'Material Design Icons', count: 7000 },
  'ph': { name: 'Phosphor Icons', count: 6000 },
  'wi': { name: 'Weather Icons', count: 215 },  // ← 新增这行
  // ... 其他图标集信息
}坑位 - process.env.UNI_PLATFORM === 'mp-weixin'
坑位:TypeScript 在 前端项目里识别不了 Node.js 的 process 全局变量。在 uni-app / Vite 项目中常见,尤其你写了:
const isMpWeixin = process.env.UNI_PLATFORM === 'mp-weixin'解决方法
1️⃣ 安装 Node 类型
pnpm add -D @types/node # 实测无需安装它
# 或 npm i -D @types/node2️⃣ tsconfig.json 配置
在 tsconfig.json 的 compilerOptions 中添加:
{
  "compilerOptions": {
    "types": ["vite/client", "node"]
  }
}vite/client→ 识别 Vite 全局类型node→ 识别process、Buffer等 Node 全局变量
为 JSON 创建类型声明
在 types/iconify-json.d.ts 中添加:
declare module '@iconify-json/mdi/icons' {
  const icons: Record<string, { body: string; width: number; height: number }>
  export = icons
}

declare module '@iconify-json/ph/icons' {
  const icons: Record<string, { body: string; width: number; height: number }>
  export = icons
}- 让 TS 和 Vite 都能识别 JSON 模块
- 按需导入时不会报错
iconify 专属坑位
- 打包体积过大 - 点击查看详情
前述 iconLoader.ts 中:
// src/utils/iconLoader.ts
import { getIconData } from '@iconify/utils/lib/icon-set/get-icon';

// 罪魁祸首,注释掉后减少了 7MB+,这完全解决了包体积问题。
// 1. 导入所有需要的图标集
import { icons as mdiIcons } from '@iconify-json/mdi';
import { icons as phIcons } from '@iconify-json/ph';
import { icons as wiIcons } from '@iconify-json/wi';

// 相当于:
// const mdiIcons = require('@iconify-json/mdi').icons
// const phIcons = require('@iconify-json/ph').icons注释上了 mid&ph 两个包的引入后,立即解决了构建后 vendor.js 体积过大的问题!
因此需要换方案:
首先,在项目根目录创建**/script/auto-icon-builder.js**:
// scripts/auto-icon-builder.js

// eslint-disable-next-line @typescript-eslint/no-require-imports
const fs = require('fs')
// eslint-disable-next-line @typescript-eslint/no-require-imports
const path = require('path')

console.log('🚀 开始自动化图标分析...')

// 1. 分析项目中使用的图标
function findUsedIcons() {
  console.log('🔍 扫描图标使用...')
  const usedIcons = new Set()

  function scanFile(filePath) {
    try {
      const content = fs.readFileSync(filePath, 'utf8')
      // 匹配各种图标使用模式
      const iconPatterns = [
        /icon=["']([^"']+)["']/g,
        /getIconSVGData\(['"]([^'"]+)['"]\)/g,
        /icon:\s*["']([^"']+)["']/g,
      ]

      iconPatterns.forEach(function (pattern) {
        let match
        while ((match = pattern.exec(content)) !== null) {
          const iconName = match[1]
          if (iconName && iconName.includes(':')) {
            usedIcons.add(iconName)
          }
        }
      })
    } catch (error) {
      // 忽略无法读取的文件
      console.log(error)
    }
  }

  function scanDirectory(dir) {
    if (!fs.existsSync(dir)) return

    try {
      const files = fs.readdirSync(dir)
      files.forEach(function (file) {
        const filePath = path.join(dir, file)
        try {
          const stat = fs.statSync(filePath)
          if (stat.isDirectory() && !file.includes('node_modules') && !file.includes('.git')) {
            scanDirectory(filePath)
          } else if (/\.(vue|js|ts)$/.test(file)) {
            scanFile(filePath)
          }
        } catch (e) {
          // 忽略权限错误等
          console.log(e)
        }
      })
    } catch (error) {
      // 忽略目录访问错误
      console.log('error', error)
    }
  }

  // 扫描 src 目录
  const srcPath = path.join(__dirname, '../src')
  scanDirectory(srcPath)

  return Array.from(usedIcons).sort()
}

// 2. 自动从图标库提取SVG数据
function extractIconData(usedIcons) {
  console.log('📦 自动提取图标SVG数据...')
  const iconData = {}

  usedIcons.forEach(function (icon) {
    const parts = icon.split(':')
    if (parts.length < 2) return

    const prefix = parts[0]
    const name = parts[1]

    try {
      // 从 @iconify-json 包中读取图标数据
      const iconSetPath = path.join(__dirname, `../node_modules/@iconify-json/${prefix}/icons.json`)
      if (fs.existsSync(iconSetPath)) {
        const iconSet = JSON.parse(fs.readFileSync(iconSetPath, 'utf8'))
        const iconInfo = iconSet.icons?.[name]

        if (iconInfo && iconInfo.body) {
          if (!iconData[prefix]) iconData[prefix] = {}
          iconData[prefix][name] = {
            body: iconInfo.body,
            width: iconInfo.width || 24,
            height: iconInfo.height || 24,
          }
          console.log(`   ✅ ${icon} - 数据提取成功`)
        } else {
          console.log(`   ❌ ${icon} - 在图标集中未找到`)
          // 如果找不到,创建占位符
          if (!iconData[prefix]) iconData[prefix] = {}
          iconData[prefix][name] = {
            body: '',
            width: 24,
            height: 24,
          }
        }
      } else {
        console.log(`   ❌ ${icon} - 图标集文件不存在`)
        // 创建占位符
        if (!iconData[prefix]) iconData[prefix] = {}
        iconData[prefix][name] = {
          body: '',
          width: 24,
          height: 24,
        }
      }
    } catch (error) {
      console.log(`   ❌ ${icon} - 提取失败: ${error.message}`)
      // 创建占位符
      if (!iconData[prefix]) iconData[prefix] = {}
      iconData[prefix][name] = {
        body: '',
        width: 24,
        height: 24,
      }
    }
  })

  return iconData
}

// 3. 生成优化加载器
function generateOptimizedLoader(usedIcons, iconData) {
  console.log('🛠️ 生成优化加载器...')

  const loaderCode =
    '// 自动生成的图标加载器 - 构建时间: ' +
    new Date().toISOString() +
    '\n' +
    '// 使用的图标: ' +
    usedIcons.join(', ') +
    '\n\n' +
    '// 自动提取的图标数据\n' +
    'export const iconDb = ' +
    JSON.stringify(iconData, null, 2) +
    ';\n\n' +
    'export const getIconSVGData = (iconName) => {\n' +
    '  try {\n' +
    "    const [prefix, name] = iconName.split(':')\n" +
    '    if (!prefix || !name) {\n' +
    "      console.warn('🚫 图标名称格式错误:', iconName)\n" +
    '      return null\n' +
    '    }\n' +
    '    \n' +
    '    const iconSet = iconDb[prefix]\n' +
    '    if (!iconSet) {\n' +
    "      console.warn('🚫 图标集不存在:', prefix)\n" +
    '      return null\n' +
    '    }\n' +
    '    \n' +
    '    const data = iconSet[name]\n' +
    '    if (!data || !data.body) {\n' +
    "      console.warn('🚫 图标数据为空:', iconName)\n" +
    '      return null\n' +
    '    }\n' +
    '    \n' +
    '    return data\n' +
    '  } catch (error) {\n' +
    "    console.error('💥 获取图标数据错误:', iconName, error)\n" +
    '    return null\n' +
    '  }\n' +
    '};\n\n' +
    'export const getMultipleIconsData = (iconNames) => {\n' +
    '  const result = {};\n' +
    '  iconNames.forEach(iconName => {\n' +
    '    result[iconName] = getIconSVGData(iconName);\n' +
    '  });\n' +
    '  return result;\n' +
    '};\n\n' +
    'export const isIconAvailable = (iconName) => {\n' +
    '  return getIconSVGData(iconName) !== null;\n' +
    '};\n\n' +
    '// 兼容性函数\n' +
    'export const loadIconSet = async () => {\n' +
    '  return true;\n' +
    '};\n\n' +
    "export const preloadCommonIconSets = async (prefixes = ['wi']) => {\n" +
    "  console.log('✅ 预加载图标集:', prefixes.join(', '));\n" +
    '};'

  const outputDir = path.join(__dirname, '../src/utils')
  if (!fs.existsSync(outputDir)) {
    fs.mkdirSync(outputDir, { recursive: true })
  }

  fs.writeFileSync(path.join(outputDir, 'iconLoader.auto.js'), loaderCode)
}

// 4. 生成使用报告
function generateUsageReport(usedIcons, iconData) {
  const report = {
    timestamp: new Date().toISOString(),
    totalIcons: usedIcons.length,
    iconsByPrefix: {},
    usageReport: usedIcons,
    extractionStats: {
      total: usedIcons.length,
      success: 0,
      failed: 0,
    },
  }

  usedIcons.forEach(function (icon) {
    const parts = icon.split(':')
    if (parts.length < 2) return

    const prefix = parts[0]
    const name = parts[1]
    if (!report.iconsByPrefix[prefix]) report.iconsByPrefix[prefix] = []
    report.iconsByPrefix[prefix].push(icon)

    // 统计提取结果
    if (iconData[prefix]?.[name]?.body) {
      report.extractionStats.success++
    } else {
      report.extractionStats.failed++
    }
  })

  const outputDir = path.join(__dirname, '../src/utils')
  fs.writeFileSync(path.join(outputDir, 'icon-usage-report.json'), JSON.stringify(report, null, 2))

  return report
}

// 主流程
try {
  const usedIcons = findUsedIcons()

  if (usedIcons.length === 0) {
    console.log('ℹ️ 未发现图标使用')
    process.exit(0)
  }

  console.log('📊 发现的图标:')
  usedIcons.forEach(function (icon) {
    console.log('  - ' + icon)
  })

  const iconData = extractIconData(usedIcons)
  generateOptimizedLoader(usedIcons, iconData)
  const report = generateUsageReport(usedIcons, iconData)

  console.log('\n✅ 完全自动化构建完成!')
  console.log('📁 生成文件:')
  console.log('  - src/utils/iconLoader.auto.js')
  console.log('  - src/utils/icon-usage-report.json')
  console.log('\n📊 统计信息:')
  console.log('  - 总图标数: ' + report.totalIcons)
  console.log('  - 数据提取成功: ' + report.extractionStats.success)
  console.log('  - 数据提取失败: ' + report.extractionStats.failed)
  Object.keys(report.iconsByPrefix).forEach(function (prefix) {
    console.log('  - ' + prefix + ': ' + report.iconsByPrefix[prefix].length + ' 个图标')
  })
} catch (error) {
  console.error('❌ 自动化构建失败:', error.message)
  process.exit(1)
}可以适当简化逻辑:
// scripts/auto-icon-builder.js

// eslint-disable-next-line @typescript-eslint/no-require-imports
const fs = require('fs')
// eslint-disable-next-line @typescript-eslint/no-require-imports
const path = require('path')

console.log('🚀 开始自动化图标分析...')

// 1. 分析项目中使用的图标
function findUsedIcons() {
  console.log('🔍 扫描图标使用...')
  const usedIcons = new Set()

  function scanFile(filePath) {
    try {
      const content = fs.readFileSync(filePath, 'utf8')
      const iconPatterns = [
        /icon=["']([^"']+)["']/g,
        /getIconSVGData\(['"]([^'"]+)['"]\)/g,
        /icon:\s*["']([^"']+)["']/g,
      ]

      iconPatterns.forEach(function (pattern) {
        let match
        while ((match = pattern.exec(content)) !== null) {
          const iconName = match[1]
          if (iconName && iconName.includes(':')) {
            usedIcons.add(iconName)
          }
        }
      })
      // eslint-disable-next-line @typescript-eslint/no-unused-vars
    } catch (error) {
      // 静默忽略无法读取的文件
    }
  }

  function scanDirectory(dir) {
    if (!fs.existsSync(dir)) return

    try {
      const files = fs.readdirSync(dir)
      files.forEach(function (file) {
        const filePath = path.join(dir, file)
        try {
          const stat = fs.statSync(filePath)
          if (stat.isDirectory() && !file.includes('node_modules') && !file.includes('.git')) {
            scanDirectory(filePath)
          } else if (/\.(vue|js|ts)$/.test(file)) {
            scanFile(filePath)
          }
          // eslint-disable-next-line @typescript-eslint/no-unused-vars
        } catch (e) {
          // 静默忽略权限错误
        }
      })
      // eslint-disable-next-line @typescript-eslint/no-unused-vars
    } catch (error) {
      // 静默忽略目录访问错误
    }
  }

  const srcPath = path.join(__dirname, '../src')
  scanDirectory(srcPath)
  return Array.from(usedIcons).sort()
}

// 2. 自动从图标库提取SVG数据
function extractIconData(usedIcons) {
  console.log('📦 自动提取图标SVG数据...')
  const iconData = {}

  usedIcons.forEach(function (icon) {
    const [prefix, name] = icon.split(':')
    if (!prefix || !name) return

    // 创建默认占位符(简化错误处理)
    if (!iconData[prefix]) iconData[prefix] = {}
    iconData[prefix][name] = {
      body: '',
      width: 24,
      height: 24,
    }

    try {
      const iconSetPath = path.join(__dirname, `../node_modules/@iconify-json/${prefix}/icons.json`)
      if (!fs.existsSync(iconSetPath)) {
        console.log(`   ❌ ${icon} - 图标集文件不存在`)
        return
      }

      const iconSet = JSON.parse(fs.readFileSync(iconSetPath, 'utf8'))
      const iconInfo = iconSet.icons?.[name]

      if (iconInfo?.body) {
        iconData[prefix][name] = {
          body: iconInfo.body,
          width: iconInfo.width || 24,
          height: iconInfo.height || 24,
        }
        console.log(`   ✅ ${icon} - 数据提取成功`)
      } else {
        console.log(`   ❌ ${icon} - 在图标集中未找到`)
      }
    } catch (error) {
      console.log(`   ❌ ${icon} - 提取失败: ${error.message}`)
    }
  })

  return iconData
}

// 3. 生成优化加载器
function generateOptimizedLoader(usedIcons, iconData) {
  console.log('🛠️ 生成优化加载器...')

  const loaderCode = `// 自动生成的图标加载器 - 构建时间: ${new Date().toISOString()}
// 使用的图标: ${usedIcons.join(', ')}

// 自动提取的图标数据
export const iconDb = ${JSON.stringify(iconData, null, 2)};

export const getIconSVGData = (iconName) => {
  try {
    const [prefix, name] = iconName.split(':');
    if (!prefix || !name) {
      console.warn('🚫 图标名称格式错误:', iconName);
      return null;
    }

    const iconSet = iconDb[prefix];
    if (!iconSet) {
      console.warn('🚫 图标集不存在:', prefix);
      return null;
    }

    const data = iconSet[name];
    if (!data?.body) {
      console.warn('🚫 图标数据为空:', iconName);
      return null;
    }

    return data;
  } catch (error) {
    console.error('💥 获取图标数据错误:', iconName, error);
    return null;
  }
};

export const getMultipleIconsData = (iconNames) => {
  const result = {};
  iconNames.forEach(iconName => {
    result[iconName] = getIconSVGData(iconName);
  });
  return result;
};

export const isIconAvailable = (iconName) => {
  return getIconSVGData(iconName) !== null;
};

// 兼容性函数
export const loadIconSet = async () => true;

export const preloadCommonIconSets = async (prefixes = ['wi']) => {
  console.log('✅ 预加载图标集:', prefixes.join(', '));
};`

  const outputDir = path.join(__dirname, '../src/utils')
  if (!fs.existsSync(outputDir)) {
    fs.mkdirSync(outputDir, { recursive: true })
  }

  fs.writeFileSync(path.join(outputDir, 'iconLoader.auto.js'), loaderCode)
}

// 主流程
try {
  const usedIcons = findUsedIcons()

  if (usedIcons.length === 0) {
    console.log('ℹ️ 未发现图标使用')
    process.exit(0)
  }

  console.log('📊 发现的图标:')
  usedIcons.forEach(icon => console.log('  - ' + icon))

  const iconData = extractIconData(usedIcons)
  generateOptimizedLoader(usedIcons, iconData)

  // 简化统计信息
  const successCount = Object.values(iconData).reduce(
    (sum, set) => sum + Object.values(set).filter(icon => icon.body).length,
    0,
  )

  console.log('\n✅ 完全自动化构建完成!')
  console.log('📁 生成文件: src/utils/iconLoader.auto.js')
  console.log('📊 统计信息:')
  console.log(`  - 总图标数: ${usedIcons.length}`)
  console.log(`  - 数据提取成功: ${successCount}`)
  console.log(`  - 数据提取失败: ${usedIcons.length - successCount}`)
} catch (error) {
  console.error('❌ 自动化构建失败:', error.message)
  process.exit(1)
}然后,在 pakage.json 中增加:
{
  "scripts": {
    "build:icons": "node scripts/auto-icon-builder.js"
  }
}src/utils/iconLoader.ts 中:
// src/utils/iconLoader.ts
import { getIconData } from '@iconify/utils/lib/icon-set/get-icon';

// 1. 只导入实际使用的图标数据(从自动生成的版本)
import { iconDb } from './iconLoader.auto';

// 1. 导入所有需要的图标集
// 罪魁祸首,注释掉后减少了 7MB+,这完全解决了包体积问题。
// import { icons as mdiIcons } from '@iconify-json/mdi';
// import { icons as phIcons } from '@iconify-json/ph';
// import { icons as wiIcons } from '@iconify-json/wi'; // ← 新增这行

// 2. 定义图标数据类型
export interface IconData {
  body: string      // SVG path 数据
  width: number     // 图标原始宽度
  height: number    // 图标原始高度
}

// 3. 类型声明
interface IconDatabase {
  wi?: Record<string, IconData>;
  mdi?: Record<string, IconData>;
  [key: string]: Record<string, IconData> | undefined;
}
const iconDbTyped = iconDb as IconDatabase;

// 3. 配置支持的图标集映射
const iconSets: Record<string, any> = {
  // // Material Design Icons - 谷歌 Material Design 风格
  // 'mdi': mdiIcons,
  // // Phosphor Icons - 灵活的一致性图标
  // 'ph': phIcons,
  // Weather Icons - 天气图标集 ← 新增这个映射
  'wi': wiIcons,
}

// 4. 图标集信息(基于实际使用的图标)
export const iconSetInfo: Record<string, { name: string; count: number }> = {
  'wi': { name: 'Weather Icons', count: Object.keys(iconDb.wi || {}).length },
  'mdi': { name: 'Material Design Icons', count: Object.keys(iconDb.mdi || {}).length }, // 添加 mdi
}

// 5. 核心图标数据获取函数
// 4. 核心图标数据获取函数
export const getIconSVGData = (iconName: string): IconData | null => {
  try {
    // 5.1 解析图标名称
    // 4.1 解析图标名称
    const [prefix, name] = iconName.split(':')

    // 5.2 验证名称格式
    // 4.2 验证名称格式
    if (!prefix || !name) {
      console.warn(`🚫 图标名称格式错误: "${iconName}"。正确格式: "前缀:图标名"`)
      console.warn(`🚫 图标名称格式错误: "${iconName}"`)
      return null
    }

    // 5.3 首先检查自动生成的数据
    // 4.3 首先检查自动生成的数据
    const autoData = (iconDb as Record<string, Record<string, IconData>>)[prefix]?.[name];
    const autoData = iconDbTyped[prefix]?.[name];
    if (autoData && autoData.body) {
      return autoData;
    }

    // 5.4 回退到原来的逻辑(如果需要)
    const iconSet = iconSets[prefix]
    if (!iconSet) {
      const supportedPrefixes = Object.keys(iconSets).join(', ')
      console.warn(`🚫 不支持的图标集: "${prefix}"。支持的图标集: ${supportedPrefixes}`)
      return null
    }
    // 5.5 获取图标数据
    const iconData = getIconData(iconSet, name)
    if (!iconData) {
      const info = iconSetInfo[prefix]
      console.warn(`🚫 图标不存在: "${iconName}"。${info ? `请在 ${info.name} 中查看可用图标` : ''}`)
      return null
    }
    // 5.6 验证数据完整性
    if (!iconData.body || !iconData.width || !iconData.height) {
      console.warn(`🚫 图标数据不完整: "${iconName}"`)
      return null
    }
    // 5.7 返回标准化数据
    return {
      body: iconData.body,
      width: iconData.width,
      height: iconData.height
    }

    console.warn(`🚫 图标不存在或数据为空: "${iconName}"`)
    return null

  } catch (error) {
    console.error(`💥 获取图标数据时发生错误: "${iconName}"`, error)
    return null
  }
}

// 6. 批量获取图标数据(优化性能)
// 5. 批量获取图标数据
export const getMultipleIconsData = (iconNames: string[]): Record<string, IconData | null> => {
  const result: Record<string, IconData | null> = {}

  iconNames.forEach(iconName => {
    result[iconName] = getIconSVGData(iconName)
  })

  return result
}

// 7. 工具函数:获取支持的图标集列表
export const getSupportedIconSets = () => {
  return Object.entries(iconSetInfo).map(([prefix, info]) => ({
    prefix,
    name: info.name,
    count: info.count
  }))
}

// 8. 工具函数:检查图标是否存在
// 6. 工具函数:检查图标是否存在
export const isIconAvailable = (iconName: string): boolean => {
  return getIconSVGData(iconName) !== null
}

// 9. 兼容性函数
// 7. 兼容性函数
export const loadIconSet = async (prefix: string): Promise<boolean> => {
export const loadIconSet = async (): Promise<boolean> => {
  console.log(`✅ 图标集 ${prefix} 已预加载`);
  return true;
}

export const preloadCommonIconSets = async (prefixes: string[] = ['wi']): Promise<void> => {
export const preloadCommonIconSets = async (): Promise<void> => {
  console.log(`✅ 预加载图标集: ${prefixes.join(', ')}`);
  console.log('✅ 图标集已预加载');
}优化后的 iconLoader.ts:
// src/utils/iconLoader.ts

// 1. 只导入实际使用的图标数据(从自动生成的版本)
import { iconDb } from './iconLoader.auto';

// 2. 定义图标数据类型
export interface IconData {
  body: string      // SVG path 数据
  width: number     // 图标原始宽度
  height: number    // 图标原始高度
}

// 3. 类型声明
interface IconDatabase {
  wi?: Record<string, IconData>;
  mdi?: Record<string, IconData>;
  [key: string]: Record<string, IconData> | undefined;
}

const iconDbTyped = iconDb as IconDatabase;

// 4. 核心图标数据获取函数
export const getIconSVGData = (iconName: string): IconData | null => {
  try {
    // 4.1 解析图标名称
    const [prefix, name] = iconName.split(':')

    // 4.2 验证名称格式
    if (!prefix || !name) {
      console.warn(`🚫 图标名称格式错误: "${iconName}"`)
      return null
    }

    // 4.3 首先检查自动生成的数据
    const autoData = iconDbTyped[prefix]?.[name];
    if (autoData && autoData.body) {
      return autoData;
    }

    console.warn(`🚫 图标不存在或数据为空: "${iconName}"`)
    return null

  } catch (error) {
    console.error(`💥 获取图标数据时发生错误: "${iconName}"`, error)
    return null
  }
}

// 5. 批量获取图标数据
export const getMultipleIconsData = (iconNames: string[]): Record<string, IconData | null> => {
  const result: Record<string, IconData | null> = {}

  iconNames.forEach(iconName => {
    result[iconName] = getIconSVGData(iconName)
  })

  return result
}

// 6. 工具函数:检查图标是否存在
export const isIconAvailable = (iconName: string): boolean => {
  return getIconSVGData(iconName) !== null
}

// 7. 兼容性函数
export const loadIconSet = async (): Promise<boolean> => {
  return true;
}

export const preloadCommonIconSets = async (): Promise<void> => {
  console.log('✅ 图标集已预加载');
}罪魁祸首是:引入的iconify包文件,导致打包后的项目体积过大。严格来说,也不是项目体积过大,而是引起了 vendor.js文件过大!
图标偏移坑位 - 点击查看详情
自动从本地 iconify 包中爬数据的逻辑,其中:
// 2. 自动从图标库提取SVG数据
function extractIconData(usedIcons) {
  console.log('📦 自动提取图标SVG数据...')
  const iconData = {}

  usedIcons.forEach(function (icon) {
    const [prefix, name] = icon.split(':')
    if (!prefix || !name) return

    // 创建默认占位符(简化错误处理)
    if (!iconData[prefix]) iconData[prefix] = {}
    iconData[prefix][name] = {
      body: '',
      width: 24,
      height: 24,
    }

    try {
      const iconSetPath = path.join(__dirname, `../node_modules/@iconify-json/${prefix}/icons.json`)
      if (!fs.existsSync(iconSetPath)) {
        console.log(`   ❌ ${icon} - 图标集文件不存在`)
        return
      }

      const iconSet = JSON.parse(fs.readFileSync(iconSetPath, 'utf8'))
      const iconInfo = iconSet.icons?.[name]

      if (iconInfo?.body) {
        iconData[prefix][name] = {
          body: iconInfo.body,
          width: iconInfo.width,
          height: iconInfo.height,
        }
        console.log(`   ✅ ${icon} - 数据提取成功`)
      } else {
        console.log(`   ❌ ${icon} - 在图标集中未找到`)
      }
    } catch (error) {
      console.log(`   ❌ ${icon} - 提取失败: ${error.message}`)
    }
  })

  return iconData
}其中:
width: iconInfo.width,
height: iconInfo.height, 根本取不到值!!!
经过一系列的排查,我得以通过ai发现,应当通过 iconSet 进行取值!!
- 进一步考虑
经历了数小时的折腾之后,对比之前的iconLoader copy-本地引入-正常.ts文件,发现其中:
// src/utils/iconLoader.ts
import { getIconData } from '@iconify/utils/lib/icon-set/get-icon';
// 5. 核心图标数据获取函数
export const getIconSVGData = (iconName: string): IconData | null => {
try {
// 5.1 解析图标名称
const [prefix, name] = iconName.split(':')
// 5.2 验证名称格式
if (!prefix || !name) {
console.warn(`🚫 图标名称格式错误: "${iconName}"。正确格式: "前缀:图标名"`)
return null
}
// 5.3 查找对应的图标集
const iconSet = iconSets[prefix]
if (!iconSet) {
const supportedPrefixes = Object.keys(iconSets).join(', ')
console.warn(`🚫 不支持的图标集: "${prefix}"。支持的图标集: ${supportedPrefixes}`)
return null
}
// 5.4 获取图标数据
const iconData = getIconData(iconSet, name)
if (!iconData) {
const info = iconSetInfo[prefix]
console.warn(`🚫 图标不存在: "${iconName}"。${info ? `请在 ${info.name} 中查看可用图标` : ''}`)
return null
}
iconify 其实提供了获取函数,于是:
如果追求准确性和未来维护方便:使用 getIconData 更好。 你的目标是生成自动加载器,保证宽高、body 都正确,避免以后出现图标显示异常,所以这个方法最稳妥。
如果只想快速生成占位符,或者图标都是标准默认大小:直接读取 JSON 也可以,但风险略高。
既然已经遇到 iconInfo.body 但没有 width/height 的问题,强烈推荐使用 getIconData,哪怕脚本要改成动态 import(),因为它能确保生成的 iconLoader.auto.js 数据完全正确。
完整的生成逻辑如下:
// scripts/auto-icon-builder.js

// eslint-disable-next-line @typescript-eslint/no-require-imports
const fs = require('fs')
// eslint-disable-next-line @typescript-eslint/no-require-imports
const path = require('path')

console.log('🚀 开始自动化图标分析...')

// 主函数 async 包裹
;(async () => {
  // 动态导入 getIconData
  const { getIconData } = await import('@iconify/utils/lib/icon-set/get-icon.js')

  // 1. 分析项目中使用的图标
  function findUsedIcons() {
    console.log('🔍 扫描图标使用...')
    const usedIcons = new Set()

    function scanFile(filePath) {
      try {
        const content = fs.readFileSync(filePath, 'utf8')
        const iconPatterns = [
          /icon=["']([^"']+)["']/g,
          /getIconSVGData\(['"]([^'"]+)['"]\)/g,
          /icon:\s*["']([^"']+)["']/g,
        ]
        iconPatterns.forEach(pattern => {
          let match
          while ((match = pattern.exec(content)) !== null) {
            const iconName = match[1]
            if (iconName && iconName.includes(':')) usedIcons.add(iconName)
          }
        })
      } catch (e) {
        console.log(e)
      }
    }

    function scanDirectory(dir) {
      if (!fs.existsSync(dir)) return
      try {
        const files = fs.readdirSync(dir)
        files.forEach(file => {
          const filePath = path.join(dir, file)
          try {
            const stat = fs.statSync(filePath)
            if (stat.isDirectory() && !file.includes('node_modules') && !file.includes('.git')) {
              scanDirectory(filePath)
            } else if (/\.(vue|js|ts)$/.test(file)) {
              scanFile(filePath)
            }
          } catch (e) {
            console.log(e)
          }
        })
      } catch (e) {
        console.log(e)
      }
    }

    const srcPath = path.join(__dirname, '../src')
    scanDirectory(srcPath)
    return Array.from(usedIcons).sort()
  }

  // 2. 自动从图标库提取SVG数据
  function extractIconData(usedIcons) {
    console.log('📦 自动提取图标SVG数据...')
    const iconData = {}

    usedIcons.forEach(icon => {
      const [prefix, name] = icon.split(':')
      if (!prefix || !name) return

      if (!iconData[prefix]) iconData[prefix] = {}

      try {
        const iconSetPath = path.join(
          __dirname,
          `../node_modules/@iconify-json/${prefix}/icons.json`,
        )
        if (!fs.existsSync(iconSetPath)) {
          console.log(`   ❌ ${icon} - 图标集文件不存在`)
          return
        }

        const iconSet = JSON.parse(fs.readFileSync(iconSetPath, 'utf8'))
        const data = getIconData(iconSet, name)

        if (data?.body) {
          iconData[prefix][name] = {
            body: data.body,
            width: data.width,
            height: data.height,
          }
          console.log(`   ✅ ${icon} - 数据提取成功`)
        } else {
          console.log(`   ❌ ${icon} - 图标未找到`)
        }
      } catch (e) {
        console.log(`   ❌ ${icon} - 提取失败: ${e.message}`)
      }
    })

    return iconData
  }

  // 3. 生成优化加载器
  function generateOptimizedLoader(usedIcons, iconData) {
    console.log('🛠️ 生成优化加载器...')

    const loaderCode = `// 自动生成的图标加载器 - 构建时间: ${new Date().toISOString()}
// 使用的图标: ${usedIcons.join(', ')}

// 自动提取的图标数据
export const iconDb = ${JSON.stringify(iconData, null, 2)};

export const getIconSVGData = (iconName) => {
  try {
    const [prefix, name] = iconName.split(':');
    if (!prefix || !name) {
      console.warn('🚫 图标名称格式错误:', iconName);
      return null;
    }

    const iconSet = iconDb[prefix];
    if (!iconSet) {
      console.warn('🚫 图标集不存在:', prefix);
      return null;
    }

    const data = iconSet[name];
    if (!data?.body) {
      console.warn('🚫 图标数据为空:', iconName);
      return null;
    }

    return data;
  } catch (error) {
    console.error('💥 获取图标数据错误:', iconName, error);
    return null;
  }
};

export const getMultipleIconsData = (iconNames) => {
  const result = {};
  iconNames.forEach(iconName => {
    result[iconName] = getIconSVGData(iconName);
  });
  return result;
};

export const isIconAvailable = (iconName) => {
  return getIconSVGData(iconName) !== null;
};

// 兼容性函数
export const loadIconSet = async () => true;

export const preloadCommonIconSets = async (prefixes = ['wi']) => {
  console.log('✅ 预加载图标集:', prefixes.join(', '));
};`

    const outputDir = path.join(__dirname, '../src/utils')
    if (!fs.existsSync(outputDir)) fs.mkdirSync(outputDir, { recursive: true })
    fs.writeFileSync(path.join(outputDir, 'iconLoader.auto.js'), loaderCode)
  }

  // 主流程
  try {
    const usedIcons = findUsedIcons()
    if (usedIcons.length === 0) {
      console.log('ℹ️ 未发现图标使用')
      return
    }

    console.log('📊 发现的图标:')
    usedIcons.forEach(icon => console.log('  - ' + icon))

    const iconData = extractIconData(usedIcons)
    generateOptimizedLoader(usedIcons, iconData)

    const successCount = Object.values(iconData).reduce(
      (sum, set) => sum + Object.values(set).filter(icon => icon.body).length,
      0,
    )

    console.log('\n✅ 完全自动化构建完成!')
    console.log('📁 生成文件: src/utils/iconLoader.auto.js')
    console.log('📊 统计信息:')
    console.log(`  - 总图标数: ${usedIcons.length}`)
    console.log(`  - 数据提取成功: ${successCount}`)
    console.log(`  - 数据提取失败: ${usedIcons.length - successCount}`)
  } catch (e) {
    console.error('❌ 自动化构建失败:', e.message)
    process.exit(1)
  }
})()至此,完结撒花!
自定义组件的自动导入
首先,自定义组件采取统一、规范的命名:
以后再说吧... 哈哈
关于vue文件行内样式换行的小坑
需要在 settings.json 当中明确指定 vue 文件的格式化工具:
{
  // 保存时自动格式化
  "editor.formatOnSave": true,
  // 启用 ESLint Flat Config
  "eslint.useFlatConfig": true,
  // "editor.defaultFormatter": "dbaeumer.vscode-eslint",
  // 文件格式化配置
  "[json]": {
    // "editor.defaultFormatter": "vscode.json-language-features"
    // 但实际上,因为 eslint.validate 不包含 json,ESLint 不会处理普通 JSON 文件
    // 所以保存时会回退到 VSCode 内置的 JSON 格式化器
    // "editor.defaultFormatter": "dbaeumer.vscode-eslint"
  },
  "[jsonc]": {
    // 只调用 VSCode 内置的 JSON/JSONC 格式化器。
    // "editor.defaultFormatter": "vscode.json-language-features",
    //
    "editor.defaultFormatter": "dbaeumer.vscode-eslint",
    "editor.tabSize": 4,
    "editor.insertSpaces": true
  },
  // ESLint 校验范围
  "eslint.validate": ["javascript", "vue", "jsonc"],
  // 配置语言的文件关联
  "files.associations": {
    "pages.json": "jsonc",
    "manifest.json": "jsonc"
  },
  "typescript.tsdk": "node_modules\\typescript\\lib",

  // --- 新增配置:只针对 Vue/JS 使用 Prettier ---
  "[vue]": {
    "editor.defaultFormatter": "dbaeumer.vscode-eslint"
  },
  "[javascript]": {
    "editor.defaultFormatter": "dbaeumer.vscode-eslint"
  },
  "editor.codeActionsOnSave": {
    "source.fixAll.eslint": "explicit",
    "source.organizeImports": "explicit"
  }
} 具体说明
🧩 现象背后的逻辑链
新增的这段配置:
// --- 新增配置:只针对 Vue/JS 使用 Prettier ---
"[vue]": {
  "editor.defaultFormatter": "dbaeumer.vscode-eslint"
},
"[javascript]": {
  "editor.defaultFormatter": "dbaeumer.vscode-eslint"
},
"editor.codeActionsOnSave": {
  "source.fixAll.eslint": "explicit",
  "source.organizeImports": "explicit"
}让 VS Code 明确地执行了 “由 ESLint 负责格式化” 这一行为。 于是,“闪跳”就消失了。为什么?👇
⚙️ 原理分析(关键点在 VS Code 的行为优先级)
当你保存文件时,VS Code 可能触发多个「格式化来源」:
| 优先级 | 来源 | 触发条件 |
|---|---|---|
| 1️⃣ | 你显式指定的 editor.defaultFormatter | 优先最高(当前生效) |
| 2️⃣ | 语言服务器(如 Volar/Vetur)内置的格式化 | 当未指定 defaultFormatter 时触发 |
| 3️⃣ | ESLint 执行的自动修复(source.fixAll.eslint) | 当保存时启用 Code Actions |
| 4️⃣ | 其他扩展或内置 formatter(如 Prettier 插件) | 当 VS Code 未明确指派时触发 |
🧠 原始状态(有“闪跳”)是这样:
- 你禁用了 Prettier 扩展 ✅
- 但 VS Code 未明确指定谁是 formatter ❌
- Volar(或 JS 语言服务)发现没有默认 formatter,于是调用了 Prettier 内部逻辑格式化
- 紧接着 ESLint(通过 fixAll)再修复 → “闪跳”现象出现
🌀 结果:两个不同的 formatter 接连修改同一个文件。
✨ 你的新配置修复了冲突的原因
当你加上:
"[vue]": { "editor.defaultFormatter": "dbaeumer.vscode-eslint" }VS Code 明确告诉自己:
「保存 .vue 文件时,只调用 ESLint 修复,不使用其他 formatter。」
于是流程变成:
保存文件 →
仅执行 ESLint 的 fixAll →
eslint-plugin-prettier 在 ESLint 内部调用 prettier 格式化 →
结果一次完成,无二次覆盖✅ 结论总结
| 项目状态 | 格式化来源 | 是否冲突 | 说明 |
|---|---|---|---|
| 未指定 formatter | Volar + ESLint | ⚠️ 闪跳 | 两者都格式化 |
指定 dbaeumer.vscode-eslint | ESLint(调用 Prettier) | ✅ 无冲突 | 统一控制 |
| 启用 Prettier 扩展但不禁 ESLint | ESLint + Prettier 扩展 | ⚠️ 闪跳 | 两套系统竞争 |
| 完全禁用 Prettier 扩展 + 指定 ESLint | ESLint(内置 Prettier) | 🟢 理想状态 | 推荐团队使用 |
💡 总结一句话:
你这段配置的本质作用,是让 VS Code 的「格式化行为」完全由 ESLint 接管, 而 ESLint 再通过
eslint-plugin-prettier内部调用 Prettier 实现一致的格式化。 从此 VS Code、Prettier、ESLint 不再打架,一切归于统一。👏
uni-icon 行内样式的覆写
组件样式会影响与之相邻的标签或文字,使两者不在同一水平线上因此需要行内覆写:
<view class="right-info">
  <uni-icons
    type="location"
    size="24"
    style="margin-left: -10rpx"
  ></uni-icons>
  <view>
    {{ greenhouse.name }}
  </view>
</view>